Making a Portable List Fence for Jousting
Master Rhys Terafan Greydragon, OL, OP
This article is dedicated to Mistress Arabella da Siena, for she insisted that we make one for her and that I share the information.
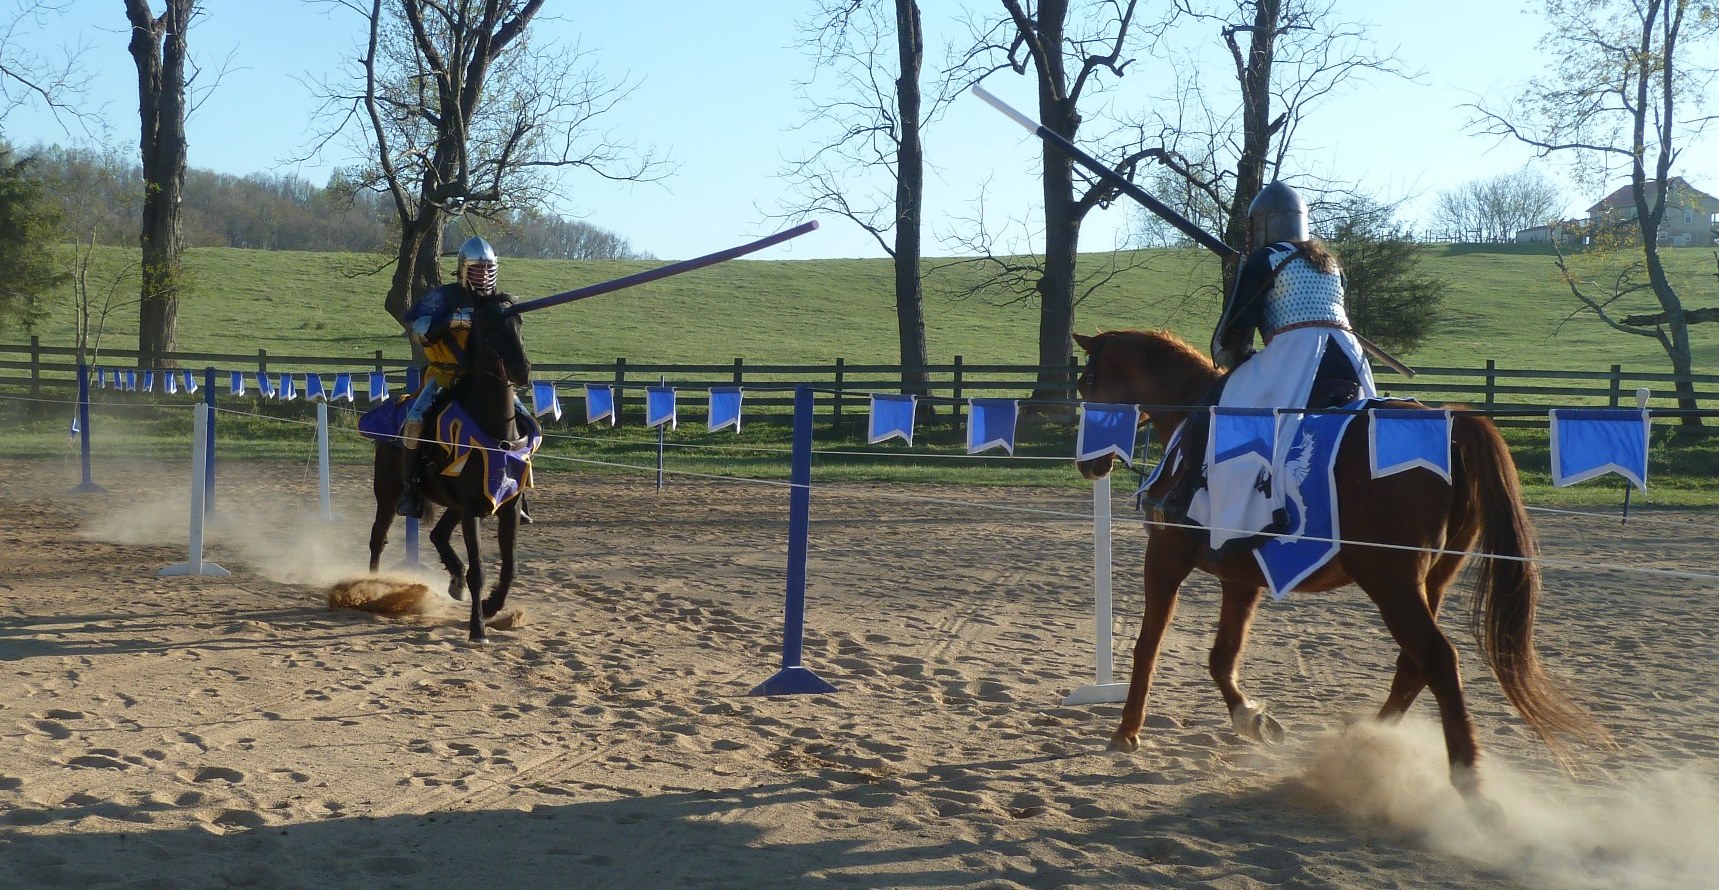
In the last few years, jousting has begun to have a significant presence at many SCA equestrian events. However, a big problem in SCA jousting has been the question of what to use for the ōlist fenceö or ōtilt railö down the center of the jousting lanes. Images of period tilt rails seem to indicate that they are ōpermanentö items, with supports sunk in the ground and not moveable. However, permanent tilt rails donÆt work well for the SCAÆs weekend events, so I have an alternative. Here are the plans and information on how to build a break-down and easily transportable list fence (such as the 5-ft tall fence in the jousting picture above) that is very sturdy and able to present a very visible presence (to both horses and riders) yet will not present a significant danger should a horse run into it. This list fence is an adaptation and enhancement of one that was first developed in Atlantia by Lord Alain de la Rochelle (Allen Blanchette), then improved upon by Lady Alienor de Bathe (Laura Daly-Barrett), and then refined by me. The list fence has minimal pieces and is very easily transportable. The ōrailö is made up of a rope inside flexible black piping. It is held up by 6 wooden uprights (making the fence) and staked down at both ends.
This article addresses five aspects of the list fence:
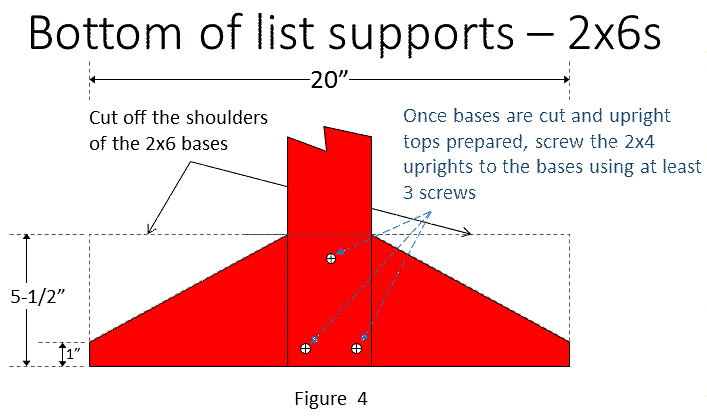
- Creating support uprights that hold up the tilt rail
- Preparing the tilt rail itself
- Setting up the tilt rail quickly and efficiently
- Making and using counter-tilts
- Putting it all together
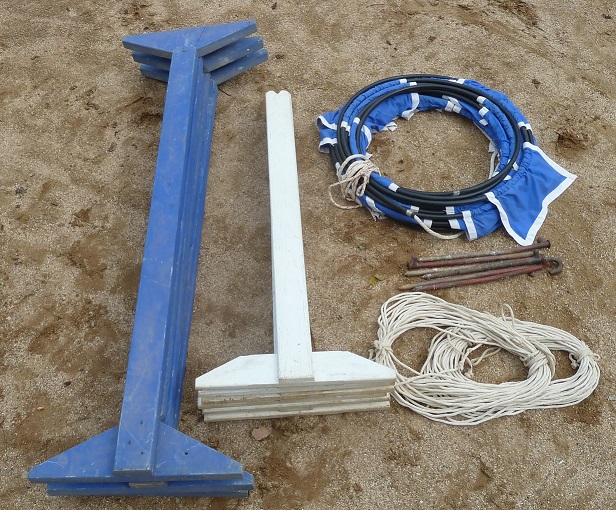
A complete set of list fence and counter-tilt pieces.
Preparing the rail
-
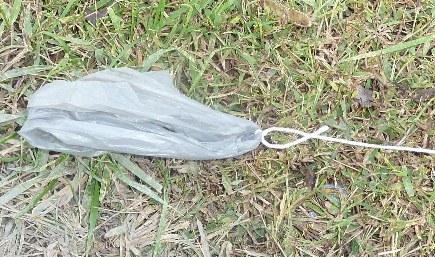
Figure 5: A bag piece tied to kite string
- Get a small piece of plastic (like 1/8 of a typical single-use plastic grocery bag), and tie it to a long piece (110Æ feet or more) of kite string (Figure 5). You just want a small piece of thin plastic that can easily get sucked through the tubing, pulling the string with it.
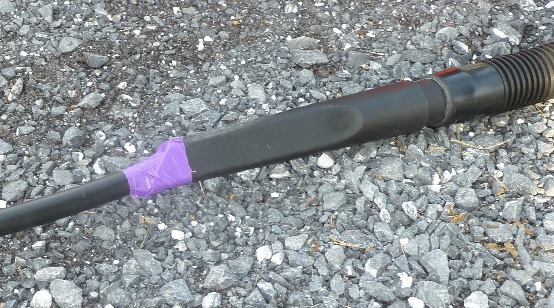
Figure 6: Tubing (left) taped to a shop vacuum crevice tool
- Stretch out the plastic tubing so it has no kinks.
- Tape the plastic tubing to the crevice tool of a shop vacuum (or any vacuum), and suck the piece of plastic and kite string through the tubing. (Figure 6). If using a regular vacuum, monitor how much string is sucked through so you donÆt get plastic in the vacuum rotor.
-

Figure 7: The kite string taped to the rope with a ōpointö to guide the rope through the tubing
- Slowly pull the kite string back through the tubing, pulling the 100Æ rope with it. This process is best done with a friend helping feed the rope into the tubing.
-
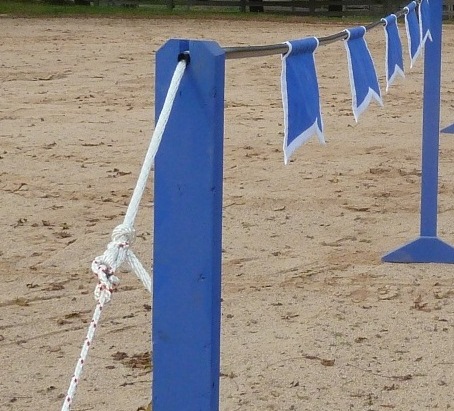
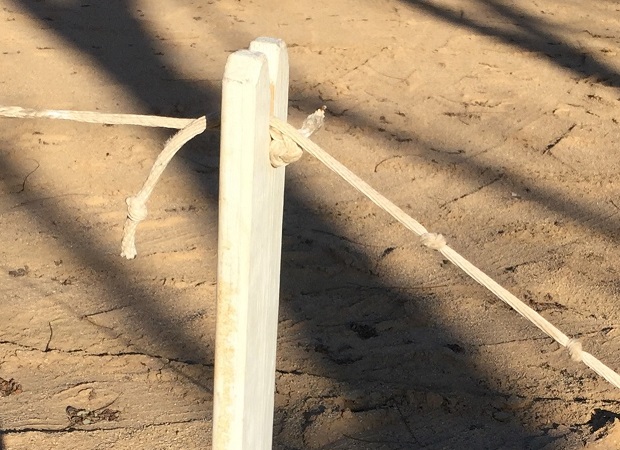
Figure 8: A sheet bend knot tying the 10Æ ōstake downö rope to the tilt rail rope.
- The plastic tubing should be marked in 6 equally
spaced places (starting at each end) with a couple wraps of duct tape. The markings should be approximately 19Æ10ö apart (from the edge of the tape marking on one side to the edge of the tape marking on the other side). These wraps of duct tape provide the following benefits:
- Identify the place for each support upright, making setup quick and easy
- Protect the tubing from chafing while being pressed through the slot into the hole at the top of the uprights
- Enlarges the tubing so it fits snugly in the hole and doesnÆt let the support upright slide along the tubing (and then fall over)

Setting up the tilt rail
- Tie a firm loop at both ends of the rope. Starting at one end of where you want the tilt rail set up, pound one of the stakes into the ground at about a 45-degree angle, and put one end loop of the rope over the stake.
- Stretch out the rail to the far end. Pull the rope taut, marking the end of the other loop, and then pound the second stake into the ground 6 inches to 1 foot from the end of the loop (i.e. closer to the first stake). The 6 inches to 1 foot of slack will provide enough slack for you to stand up the uprights under the rail. The amount needed will somewhat depend on the height of your uprights. As you set up the rail a couple times, you can adjust the placement of the second stake so the rail is as tight as you need it without having to tie and un-tie/re-tie the rope around the stake.
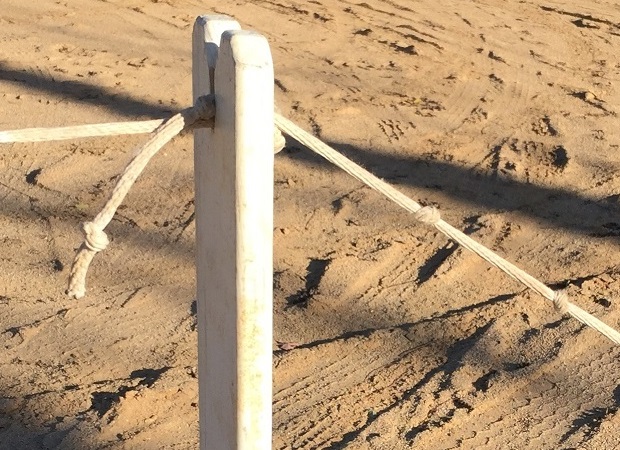
- Starting at the ends, stand up an upright underneath the rail at each duct tape wrapped location, sliding the tubing with the duct tape wrap through the slot so it rests in the hole. See figure 9. You will probably have to tilt the upright so the bottom is toward the midpoint of the tilt rail, and slide the rail through the slot and then move the base so the upright is vertical. The two end uprights might need to be angled just slightly outward.
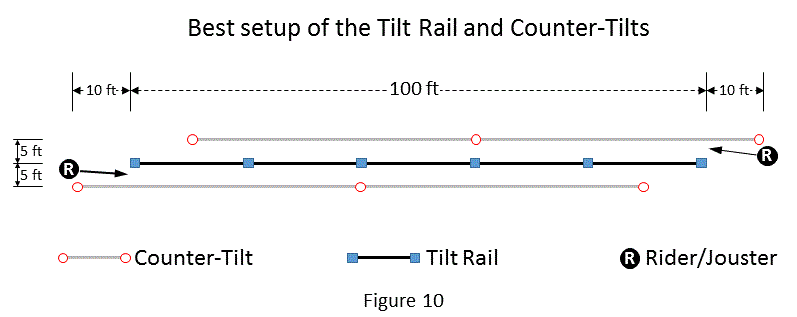
Using Counter-tilts
Experience over many years has shown that most jousts turn out better, with horses running more true down the rail and not swerving out/away from oncoming riders, when counter-tilts are used. A counter-tilt is simply a rope (or similar indicator) set up about 5 feet off the tilt rail and running at least 75% of the distance down the tilt rail. Many people like the counter-tilts to run the full length of the rail, but that is a personal preference. There are a couple of different options on where to place the starting ends of the counter-tilt, but the best option is to place the starting end of the counter-tilt about 10Æ before the starting end of the tilt rail. See Figures 10 and 11. This creates a natural entrance into the lane, especially when coming around from the other side of the tilt rail. If the counter-tilt is the same length as the tilt rail, then this set-up ends the counter-tilt about 10Æ-15Æ from the end of the tilt rail, giving a nice opening space at the end, allowing ground crew easier access to the rider and horse that have just finished their run.
There are a couple of different options for creating counter-tilts. The first (and perhaps easiest) option is a small white cord (preferably cotton) that is set up using 3 step-in posts on each side of the tilt rail. If the cord is small enough (and light enough) it can simply be tied to the end posts. A fourth step-in post can be used to create a ōfunnelö with a wider opening at the start of each end (8Æ-10Æ wide), and narrowing to the 5-foot-wide mark about 5-10Æ in from the starting end of the tilt rail.
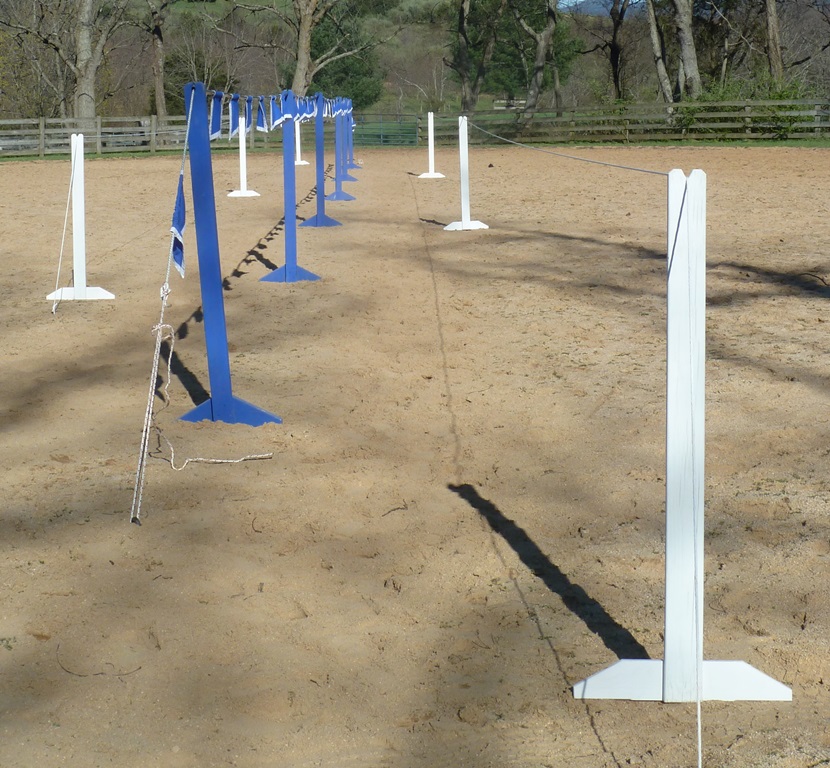
Figure 11: Tilt rail showing the ideal counter-tilt setup.
A nicer counter-tilt option is to create 6 uprights in a similar style as the tilt rail uprights, but using 1x4 lumber and 1-1/2ö long exterior screws (or 2x4 lumber with 2-1/2ö screws). Make the bases the same 20ö wide and the uprights only 48ö tall. (This makes it easy to purchase four (4) 8Æ long boards and cut 3 of them in half for the uprights, and cut the last board for the 20ö bases.) Using 4 more stakes, a 100Æ cotton rope can be staked out in the same fashion as the tilt rail, and simply stood up (with three uprights on each side). This style of uprights allows you to use a heavier and stronger rope than what is supported by step-in posts. See Figure 11.
The safest method for setting up the counter-tilt is so that the counter-tilt will come down (and come loose) when a horse runs into it. Rather than having one piece of rope that is staked down at each end, we can use 3 pieces of rope that will ōseparateö when the counter-tilt is knocked down. One (100Æ) long piece (counter-tilt rope) to provide the visual line, and two short pieces (hold down ropes) to hold the uprights. The long piece should have a knot at each end. The short pieces should have several knots tied along the end that goes to the upright, and a loop at the other end (to go around the stake). The long rope is first set in a notch in the end uprights, with the short (hold down) rope set in the notch over the top of the long piece (but from the other direction) and then staked down. The knot in the long piece and the knots in the short piece hold the rope from sliding through the notch. However, if the counter-tilt is knocked over, the knots slide out of the notch, and the long counter-tilt rope becomes loose. If the counter-tilt needs to be tightened, the end uprights can be moved so they are further ōdownö the short rope, being held by the next knot. See Figure 12.
|
|
Figure 12: Counter-tilt upright, showing counter-tilt rope (to the left) and the hold down rope (to the right), with the hold down rope tightened to the 2nd knot.
|
The two uprights on the ends of each counter-tilt should have a 2-inch long notch to hold the rope (Figure 13). The middle upright of each counter-tilt doesnÆt need a fancy notch, but just need a simple V-notch at the top to hold the rope (Figure 14). The middle upright ought to be constructed so it is 2-3 inches taller than the end uprights. This allows the counter-tilt rope to put pressure on the center upright and hold it erect. You can either cut the end uprights at 47ö and the centers at 49ö, or screw the center upright boards 2ö above the bottom of the base.
|

|
Figure 13: Counter-tilt end upright (with a long notch)
|
Figure 14: Middle upright (with a plain notch). This upright should be 2-3ö taller.
|
Putting it all together
Once you have all the pieces (tilt rail and uprights, counter-tilt ropes and uprights, and 6 stakes), it should take 2 people less than 5 minutes to set up the jousting lane. When setting it up, you will find that 2 hammers will significantly speed the set up process. Once you stretch out the tilt rail, each person simply hammers in the stake at their end and each set up 3 uprights. Then each person hammers in the stake for the starting end of the counter-tilt rope on their right side of the tilt rail (about 10 feet back from the tilt rail stake and 5 feet to the right). Once that is in, they can stretch out their counter-tilt rope and hammer in the far end, and then set up the 3 uprights.
Finally, the tilt rail can be enhanced with banners and flags. A nice set of short hangings (no more than 18ö or so) will make the tilt rail more visible to horses and spectators, and it can also significantly enhance the entire presentation and look of the joust. Be careful not to make the hangings too long because hangings that are too long can blow in the breeze and will (mentally) impede the horse on the downwind side if they stick out too far into the lane. Weights in the bottom of the hangings will minimize this in a gentle wind.
With minimal effort and only a few woodworking tools, anyone can make one of these portable list fences, and it can make a significant difference in the quality of the joust, both visually for spectators and in the performance of the jousters and horses. This break-down and easily transportable list fence is very safe and can be a huge addition to the joust at any event. Enjoy!
Copyright 2017 by Peter C. Barclay. Permission granted for not-for-profit copying and distribution, provided this notice remains attached.

Return to the Equestrian Equipment page or to the Greydragon library.
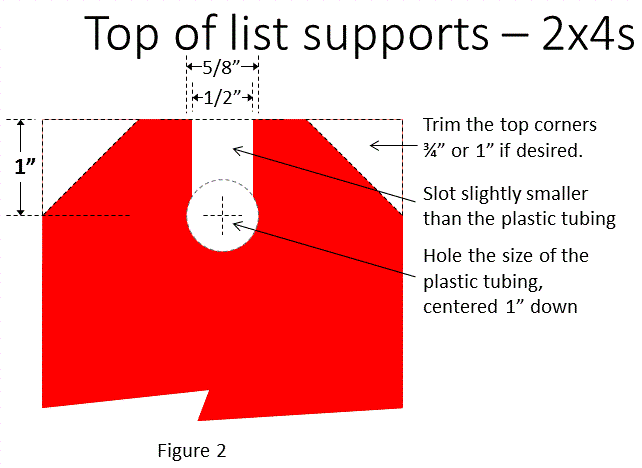
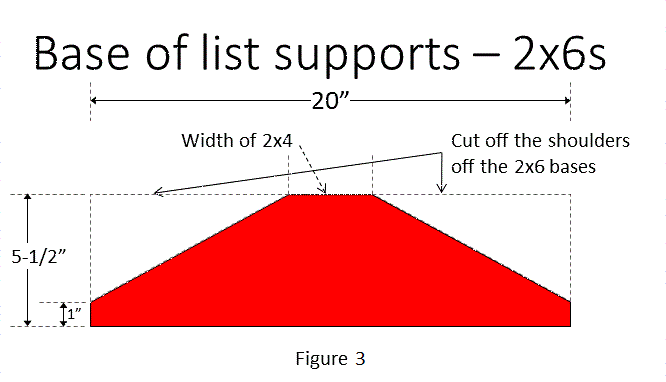
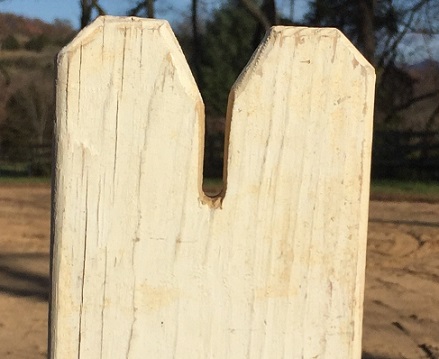
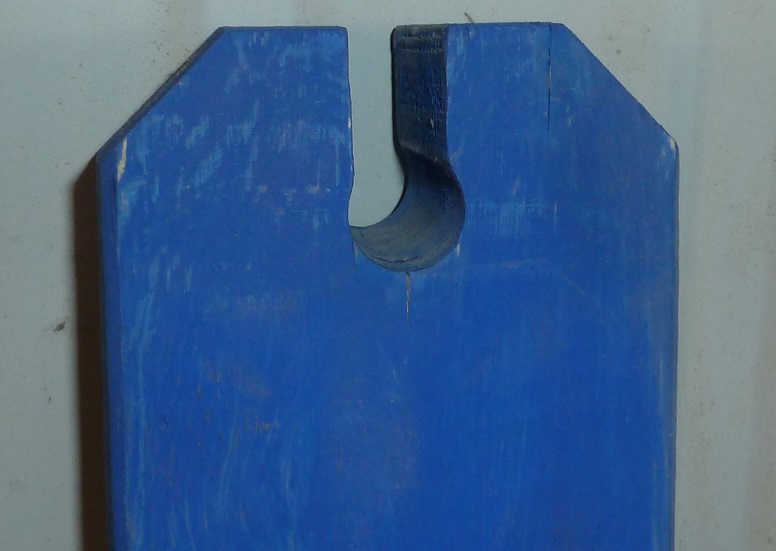 Drill a hole, the size of your plastic tubing in the center, one inch down from the top. See figure 2. Then cut a slot (from the top) that is 1/8ö narrower than the hole.